専用のディスプレイやキーボードを使わずに、パソコン(Windows)だけでラズベリーパイ(Raspberry Pi Zero WH)の環境設定をしていきます。
 うさたん
うさたん初期設定したらから、もう動かせる?
 まある
まあるちょっと待ってね。
ラズベリーパイが使えるように、
もう少し設定があるんだよ
前回紹介したラズベリーパイ(Raspberry Pi Zero WH)の初期設定の記事はこちらです。
ラズベリーパイのパスワードを変更
まずは、パスワードが、デフォルトのままだと危険なので変更します。
TeraTermを起動して、ログインします。
パスワード変更のコマンドを入力します。
$ passwd  ←パスワードを変更
Changing password for pi.
(current) UNIX password:        ←今のパスワードを入力
Enter new UNIX password:      ←新しいパスワードを入力
Retype new UNIX password:    ←もう一度、新パスワードを入力
passwd: password updated successfully ← やった 成功です!
ラズベリーパイのパッケージ更新
次にapt-getコマンド(パッケージの操作・管理を行うコマンド)で、パッケージを更新します。
パッケージとは、ある機能を実現するために必要ないくつかのファイルをひとまとめにしたものです。
1. インストール可能なパッケージの「一覧」を更新します。
$ sudo apt-get update(途中 「Do You Want to continue?」と聞かれたら、キーボードの「Y」キー、enterキーを押します。)
2. 上のコマンドに続いて、新しいバージョンにアップグレードするコマンドを実行します。
$ sudo apt-get upgrade3. ディストリビューションを更新して、パッケージ間の依存関係を整えます。
$ sudo apt-get dist-upgradeディストリビューション?
まあるOSと周辺のアプリをパックにしたものだよ
ラズベリーパイに日本語フォントをインストール
日本語のフォントをインストールします。
$ sudo apt-get install fonts-ipaexfont(「続行しますか?[Y/n] 」と聞かれたら、キーボードの「Y」キー、enterキーを押します。)
ラズベリーパイにvimインストール
vim(ヴィム)という有名なテキストエディタをインストールします。
$ sudo apt-get install vim(「続行しますか?[Y/n] 」と聞かれたら、キーボードの「Y」キー、「enter」キーを押します。)
TeraTermでSSH暗号鍵を作成
SSHログインを安全に行うため、公開鍵認証方式でログインするようにします。
公開鍵認証は、サーバーにおいてある「公開鍵」に合う「秘密鍵」を持っているパソコンからのみログインできるという認証方式です。
TeraTermのメニューから「設定」→「SSH鍵生成」を選択します。
「鍵生成」ウィンドウで、[生成]ボタンをクリックします。
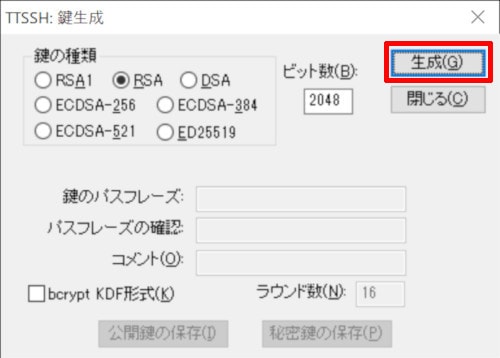
「鍵を生成しました」と表示されたら、
| 鍵のパスフレーズ | 8~64文字のフレーズ |
| パスフレーズの確認 | もう一度同じフレーズ |
| コメント | 空欄でOK |
を入力し、「公開鍵の保存」ボタンをクリック。
公開鍵ファイル(id_rsa.pub)を好きな場所に保存します。
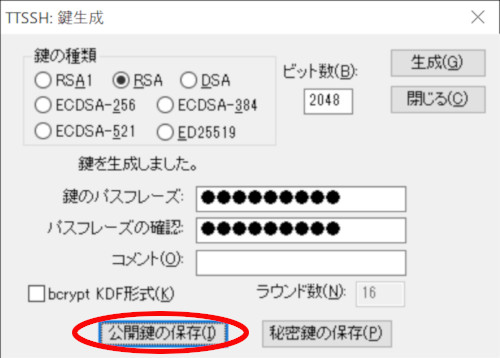
「秘密鍵の保存」ボタンをクリックし、秘密鍵ファイル(id_rsa)を好きな場所に保存します。
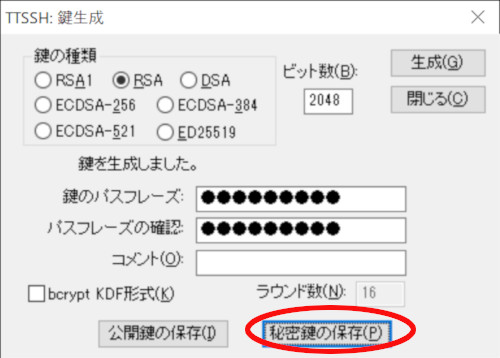
「閉じる」ボタンをクリックして「鍵生成」ウィンドウを閉じます。
パスフレーズは、あとでログインするときに使います。
公開鍵をラズベリーパイに設定
WinSCPのインストールと起動
窓の杜のWinSCPからファイルをダウンロードします。

ダウンロードしたWinSCP-5.13.7-Setup.exe(9.1MB)をダブルクリックして、デフォルトの設定のままインストールすると、自動で起動します。
起動しない場合は、WinSCPアイコンをダブルクリックして起動します。
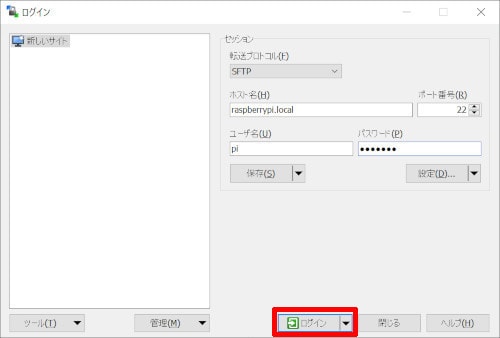
ログイン画面で
| ホスト名 | raspberrypi.local |
| ユーザ名 | pi |
| パスワード | (変更したパスワード) |
と入力し、「ログイン」ボタンをクリックします。
「不明なサーバーに接続し、そのほホスト鍵をキャッシュに追加しますか?」というウィンドウが表示されたら、「はい」ボタンをクリックします。
WinSCPの設定変更
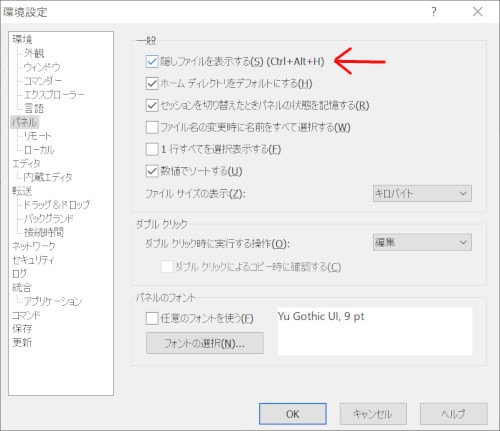
隠しファイル(「.」で始まるファイルなど)を、表示するよう設定を変更します。
メニューの[オプション]-[環境設定]をクリックします。
「環境設定」ウィンドウの左側のツリーで「パネル」を選択し、右側の「隠しファイルを表示する」をチェックして、「OK」ボタンをクリックします。
WinSCPで「.ssh」ディレクトリを作成
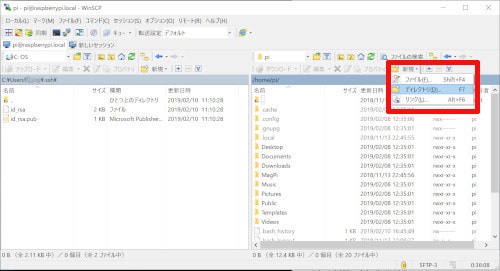
WindSCPの左側のウィンドウには、パソコン(Windows)の中が表示されています。
先ほどSSH鍵を保存したフォルダまで移動します。
右側のウィンドウには、ラズベリーパイ(Raspberry Pi Zero WH)の中が表示されています。
右側ウィンドウの上にある「新規」ボタン右側の▼をクリックし、「ディレクトリ」を選択します。
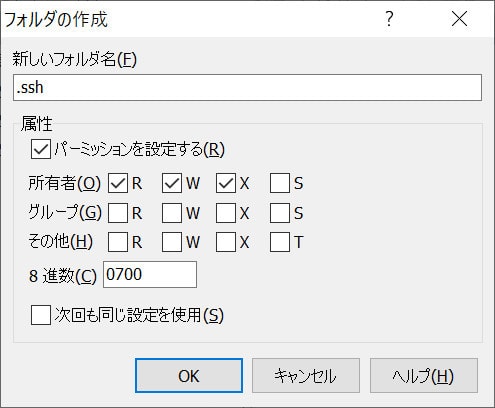
「フォルダの作成」画面で、
| 新しいフォルダ名 | .ssh |
| パーミッションを設定する | チェック |
| 所有者のR(読み込み) W(書き込み) X(実行)の権利のみチェック (8進数が「0700」と表示されていることを確認します) |
を設定し、「OK」ボタンをクリックします。
作成した「.ssh」ディレクトリをダブルクリックして移動します。
(右側ウィンドウに/home/pi/.sshが表示されている状態です)
WinSCPでSSH公開鍵をラズベリーパイに設定
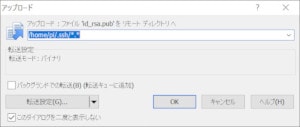
パソコンで作成した公開鍵(id_rsa.pub)をラズベリーパイ(/home/pi/.ssh/)にコピーします。
左側のウィンドウの「id_rsa.pub」ファイルを、右側のウィンドウ(.sshの下)にドラッグアンドドロップします。
「アップロード」ウィンドウが表示されたら「OK」ボタンをクリックします。
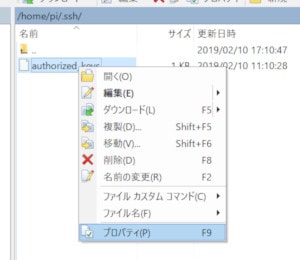
名前を「authorized_keys」に変更します。
右側ウィンドウのコピーした「id_rsa.pub」ファイルをクリックして、名前を「authorized_keys」に変更します。
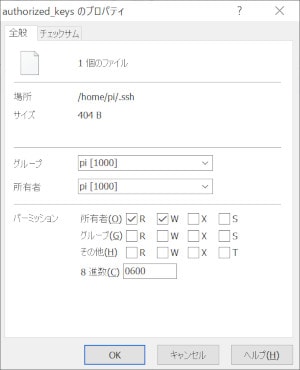
「authorized_keys」ファイルのパーミッションを変更します。
「authorized_keys」ファイルの上でマウスの右ボタンをクリックし、表示されたメニューの中から「プロパティ」をクリックします。
パーミッションを所有者のRとWだけチェックされている状態にします。
8進数が「0600」になっていることを確認して(重要!)、「OK」ボタンをクリックします。
WinSCPはこれで終了します。ウィンドウ右上の×をクリックして終了させてください。
TeraTerm 公開鍵認証でSSH接続
ラズベリーパイのSSH設定ファイル編集
TeraTermでSSH設定ファイル(sshd_config)を編集します。
$ sudo vim /etc/ssh/sshd_config下の2行だけ、変更します。
#PermitRootLogin prohibit-password
↓
PermitRootLogin no //SSHのrootログイン禁止
#AuthorizedKeysFile .ssh/authorized_keys .ssh/authorized_keys2
↓
AuthorizedKeysFile .ssh/authorized_keys //公開鍵のファイル場所
vimでの変更方法
削除は「x」キー 追加モードは「a」キー 挿入モードは「i」キー
追加・挿入モード終了は「esc」キー
編集終了後、[esc]キー :(コロン) wq で保存して終了
TeraTermでSSH認証
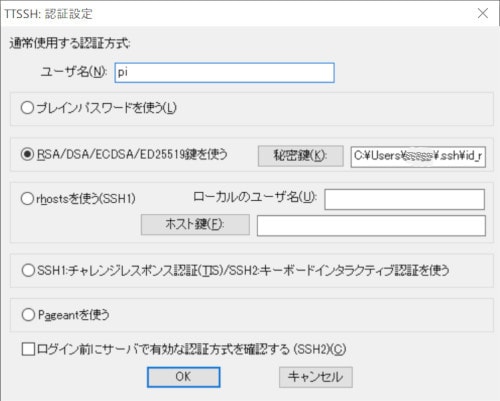
TeraTermのメニューで、[設定]-[SSH認証]を選択します。
| ユーザー名 | pi |
| RSA/DSA/ECDSA/ED25519鍵を使う | 選択 |
| 「秘密鍵」ボタンをクリック | 作成したファイル「id_rsa」を選択 |
「OK」ボタンをクリックします。
TeraTermでSSH設定を保存
メニューから[設定]-[設定の保存]を選択し、設定を保存します。
たとえば、TeraTermをインストールしたディレクトリ下に保存する場合、 C:Program Files (x86)teratermTERATERM.INI
に保存します。
TeraTermで公開鍵認証接続
メニューから[ファイル]-[新しい接続]を選択し、「OK」ボタンをクリックします。
パスフレーズを入力して「OK」ボタンをクリックします。
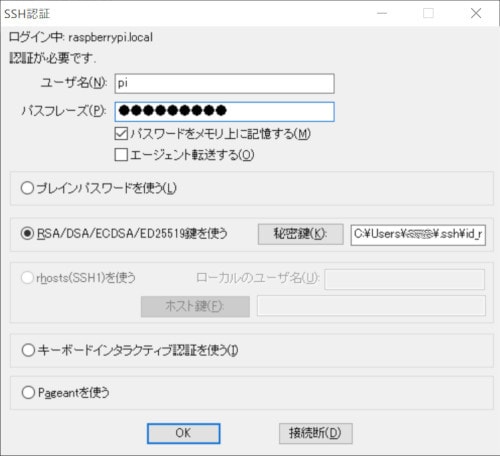
接続情報を保存したので、パスフレーズを入力するだけで、公開鍵認証を使った接続ができるようになりました。
パスワードでのログインを禁止にする
公開鍵認証でログインできるようになったので、通常のパスワードでのログインができないように設定を変更しておいたほうが安心です。
もう一度、SSH設定ファイル(sshd_config)を編集します。
$ sudo vim /etc/ssh/sshd_config下の行だけ、変更します。
# パスワードでのログイン禁止
#PasswordAuthentication yes
↓
PasswordAuthentication no
RealVNCでラズベリーパイに接続
RealVNC(Virtual Network Computing)は、パソコンを遠隔操作するソフトです。
ラズベリーパイ(Raspberry Pi Zero WH)の画面を手元のパソコンに表示して操作することができるようになります。
ラズベリーパイのVNCサーバーを有効にする
先に、ラズベリーパイ(Raspberry Pi Zero WH)のVNCサーバーがデフォルトでオフなので、起動するよう変更します。
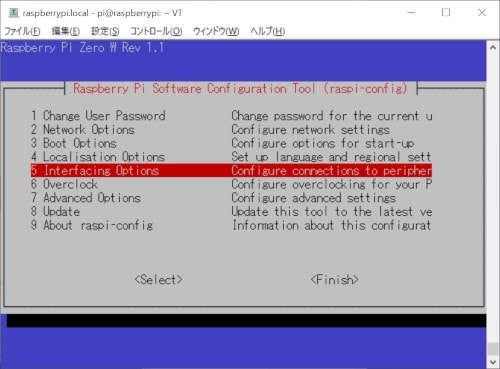
TeraTermで以下のコマンドを入力します。
$ sudo raspi-configラズベリーパイ(Raspberry Pi Zero WH)の設定ツールが起動するので、「5 Interfacing Options」を選択を選択します。
「P3 VNC」を選択し、enable(有効)を選択してEnterキーを押します。
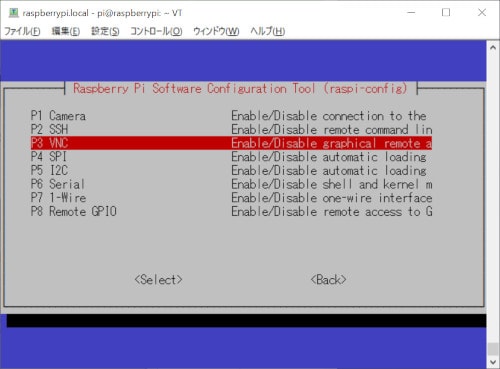
Would you like the VNC Server to be enabled?
と聞かれたら、<はい>を選択してEnterキーを押します。
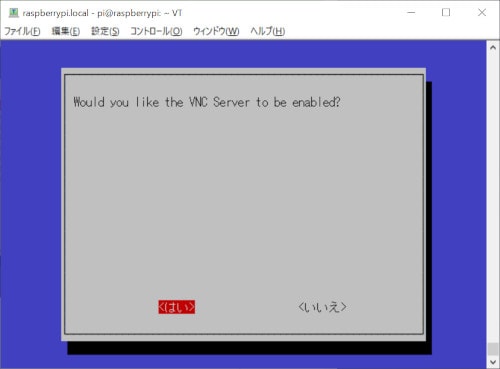
The VNC Server is enabled と表示されたら、Enterキーを押します。
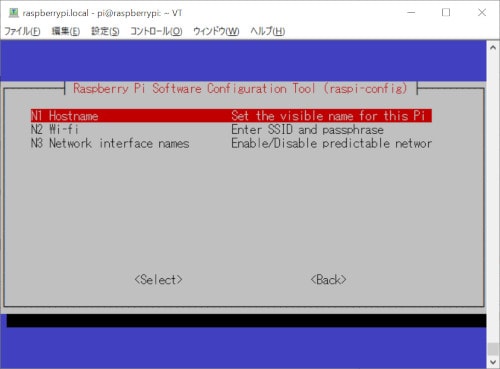
次に「2 Network Options」ー「N1 Hostname」を選択してEnterキーを押します。
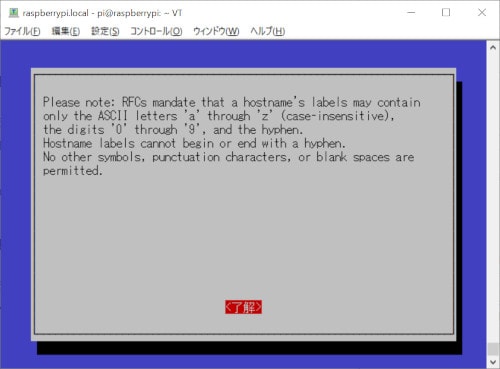
Please note画面が表示されるので、Enterキーを押します。
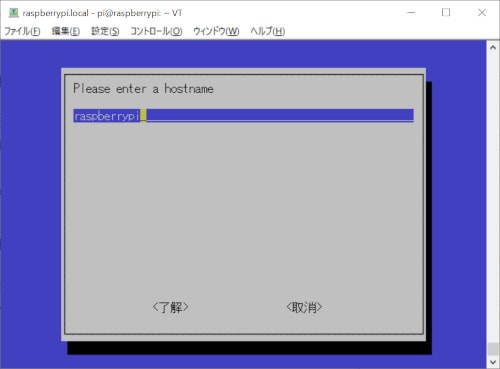
「Please enter a hostname」画面が表示されるので、ホスト名を確認します(必要があれば変更します)。
デフォルトのホスト名は、「raspberrypi」です。
下矢印キーで<了解>が選択されている状態でEnterキーを押します。
右矢印キーを押して、<Finish>を選んでEnterキーで終了させてください。
reboot(再起動)するか聞かれたら、<はい>を選んで、Enterキーを押してください。
RealVNCをインストール
「RealVNC」の「Download VNC Viewer」ボタンをクリックして、VNC Viewerをダウンロードします。
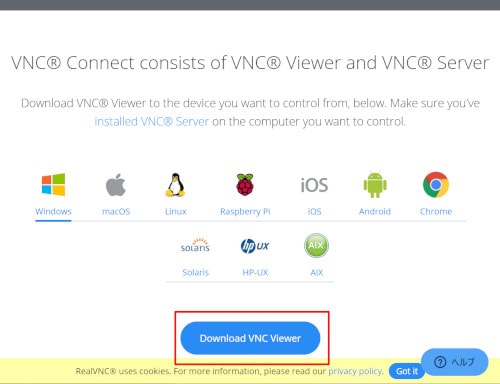
ダウンロードした「VNC-Viewer-6.19.107-Windows.exe」ファイルをダブルクリックして、デフォルトの設定のままインストールします。
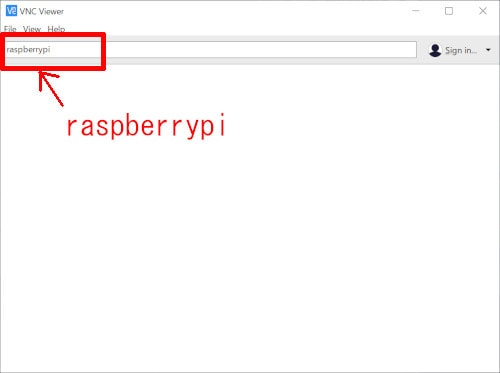
VNC Viewerでラズベリーパイに接続
Windowsのメニューから、「VNC Viewer」を起動します。
上のバーに先ほど確認したhostname「raspberrypi」を入力してEnterキーを押します。
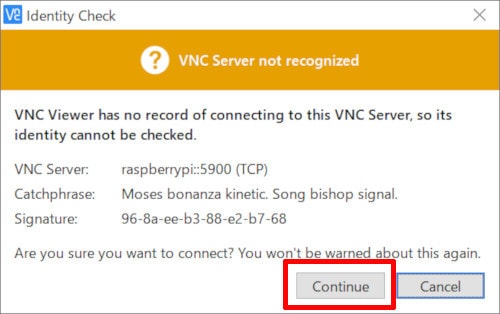
確認画面が表示されたら、「Continue」ボタンをクリックします。
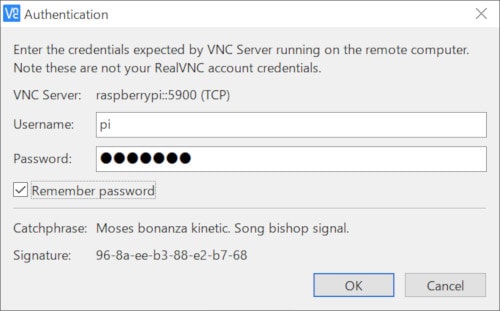
認証画面が表示されたら、
| ユーザー名 | pi |
| パスワード | (変更したパスワード) |
| Remember password | チェック |
[OK]ボタンをクリックします。
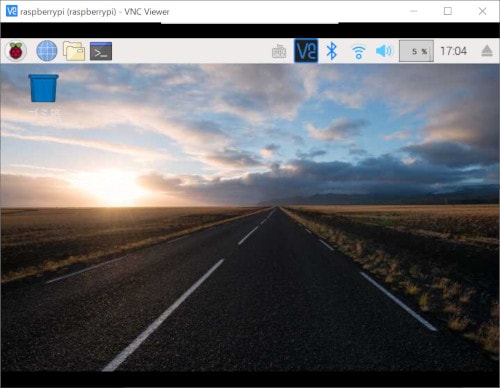
ラズベリーパイ(Raspberry Pi Zero WH)の画面が表示されます。
まあるすごーい! きれいにゃ!!
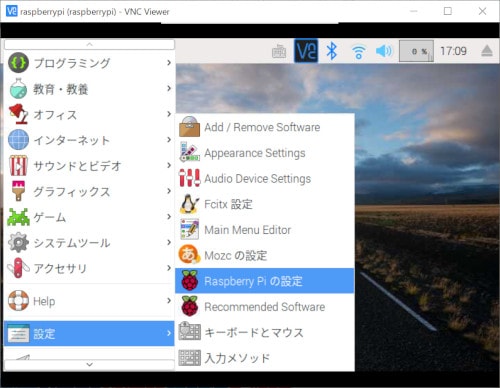
GUIでラズベリーパイの設定変更
左上のラスベリーのマーク「メニューアイコン」をクリックし、「設定」ー「Raspberry Piの設定」を選択します。
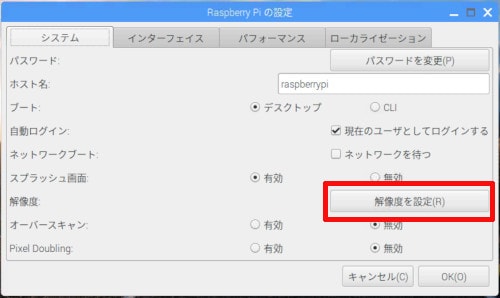
ラズベリーパイのディスプレイ設定
デフォルトでは、解像度が低く設定されているので変更します。
「解像度を設定」ボタンをクリックします。
「解像度の設定」ウィンドウで、▼をクリックします。
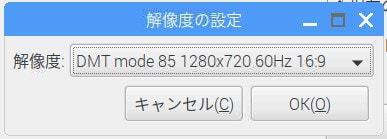
今回は、「DMT mode 85 1280×720 60Hz 16:9」を選択してちょうどよかったです。お使いのモニタに合わせて選択してください。
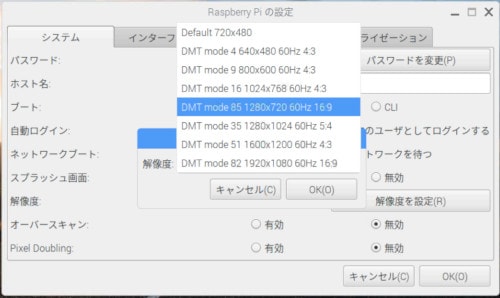
変更を反映させるために、ラズベリーパイ(Raspberry Pi Zero WH)を再起動します。
ラズベリーパイのロケール設定
もう一度、「メニューアイコン」-「設定」ー「Raspberry Piの設定」で設定画面を表示します。
「ローカライゼーション」タブを選択し、「ロケールの設定」ボタンをクリックします。

「ロケール」ウィンドウで
| 言語 | ja(Japanese) |
| 文字セット | UTF-8 |
を設定して、「OK」ボタンをクリックします。

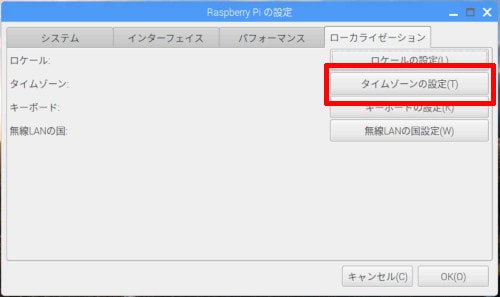
ラズベリーパイのタイムゾーン設定
次に「タイムゾーンの設定」ボタンをクリックします。
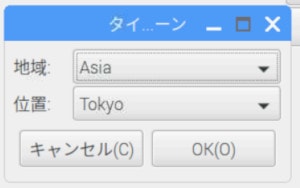
「タイムゾーン」ウィンドウで
| 地域 | Asia |
| 位置 | Tokyo |
を設定し、「OK」ボタンをクリックします。
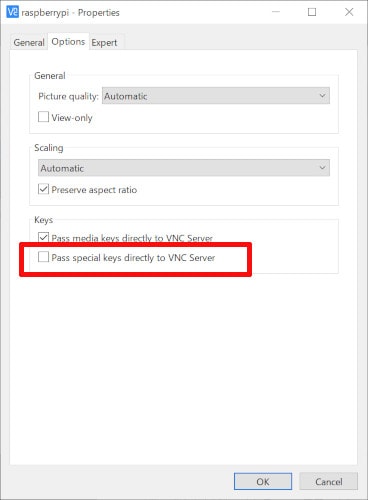
RealVNCのスクリーンショット設定
ちなみに、デフォルトの設定ではRealVNCの画面のスクリーンショット(プリントスクリーン)がとれないので、必要であれば設定を変更します。
VNC Viewerの画面で、接続情報を右クリックし、メニューから「Properties」を選択します。
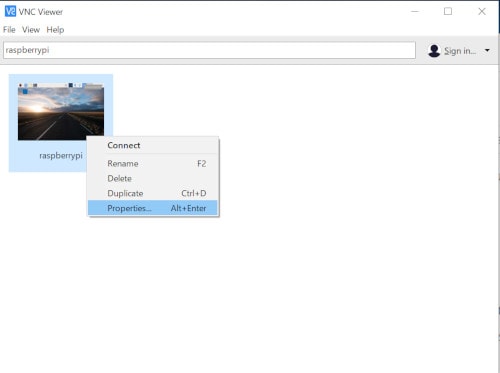
「Pass special keys directly to VNC Server(特別なキーをサーバへ直接送る)」のチェックを外すことで、スクリーンショットがとれるようになります。
 うさたん
うさたんおつかれさまでした。
まとめ
以上で環境設定は終わりです。
ラズベリーパイ(Raspberry Pi Zero WH)のグラフィカルな画面が見られたときは、驚きませんでしたか?
あんなに小さなボードなのに、あんなにきれいなGUIが実現できるなんて! と、かなり感動してしまいました。
次は、いよいよラズベリーパイ(Raspberry Pi Zero WH)でLEDを動かしていきたいと思います!
