Android Studioで、SQLiteデータベースにデータを保存・更新し、その結果を画面に表示して確認する方法を紹介します。
Googleは、Roomという抽象化レイヤを使ってSQLiteにアクセスすることを推奨しています。
ここでは、SQLiteの操作とデータの流れを確認するため、Roomを使わないで直接SQLiteにアクセスする簡単なアプリを紹介しています。
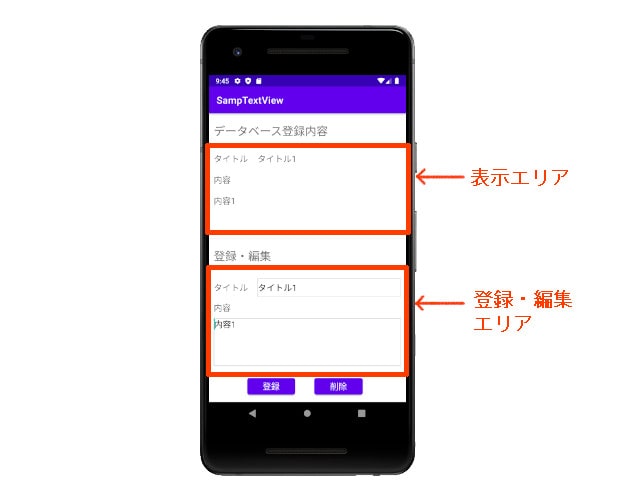
作成するのは、画面下側のEditTextに文字列を入力して [登録] ボタンをクリックすると、データベースに登録され、上側のTextViewに登録された文字列が表示される画面です。
EditTextに、別の文字列を入力して [登録] ボタンをクリックすると、データが更新されます。
[削除] ボタンをクリックすると、データベース内のデータが削除されます。
このシンプルなアプリを題材に、データベースの作成方法や、テーブルにアクセスする方法を紹介します。
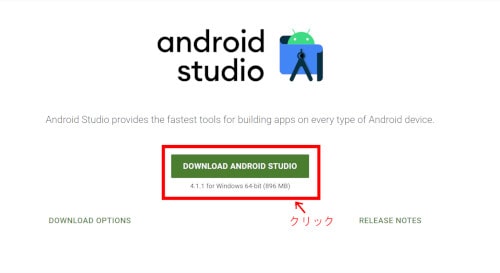
Android Studioのインストール方法と簡単な使い方については、こちらの記事を参照ください。
構成
オブジェクトの構成は、このようになっています。
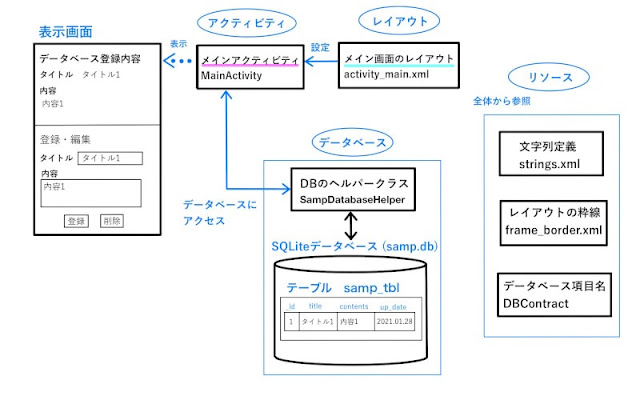
メインアクティビティ(MainActivity)が、レイアウトファイル(activity_main.xml)を使って画面を表示します。
データベースへは、データベースヘルパー(SampDatabaseHelper)クラスを経由してアクセスしています。
表示に使用する文字列やデータベースの項目名などは、リソースに定義しているstrings.xmlなどを参照します。
順を追って、内容を詳しく説明していきます。
プロジェクト作成
「Android Studioをインストール」の「プロジェクト作成」で紹介した手順で、プロジェクトを作成します。
プロジェクト名は、 「SampTextView」 としました。
リソース準備
アプリ内から参照するリソースを準備します。
strings.xml
アプリ内で使用する文字列の定義をします。
app/res/vlues/strings.xml を開いて、次の内容に編集します。
<resources>
    <string name="app_name">SampTextView</string>
    <string name="db_title">データベース登録内容</string>
    <string name="reg_title">登録・編集</string>
    <string name="title">タイトル</string>
    <string name="input_title">タイトルを入力</string>
    <string name="contents">内容</string>
    <string name="input_contents">内容を入力</string>
    <string name="reg">登録</string>
    <string name="del">削除</string>
</resources>
定義したnameを指定して、プログラムやレイアウトから参照します。
frame_border.xml
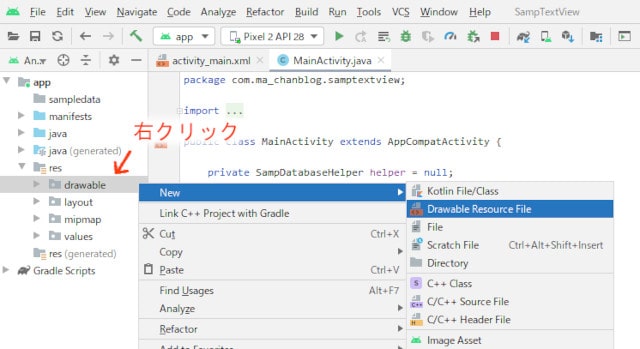
リソースファイルを追加します。
app/res/drawable を右クリックして、[New] - [DrawableResourceFile] をクリック。
File nameに「frame_border」と入力して「OK」ボタンをクリックします。
次の内容に編集します。
<?xml version="1.0" encoding="utf-8"?>
<shape xmlns:android="http://schemas.android.com/apk/res/android">
    <stroke  android:width="3px" android:color="#CCCCCC" />
    <padding android:left="2px"  android:top="2px"
             android:right="2px" android:bottom="2px" />
    <corners android:radius="2px" />
</shape>
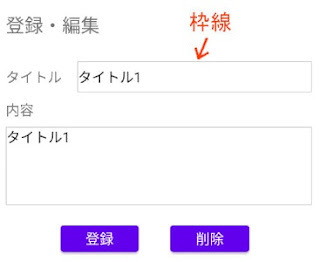
これは、タイトルなどの入力欄に枠線を表示するために定義しました。
DBContract
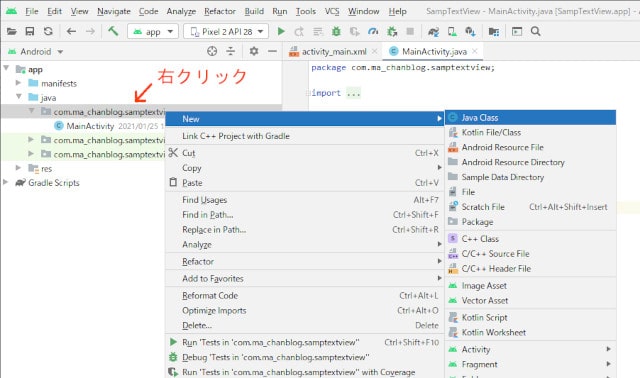
データベースのテーブル名や項目名を定義するコントラクトクラスを追加します。
フォルダを右クリックして、メニューから [new] - [Java Class] をクリックします。
New Java Class ウィンドウが表示されるので 「DBContract」と入力します。
次の内容に編集します。
package com.ma_chanblog.samptextview;

import android.provider.BaseColumns;

// データベースのテーブル名・項目名を定義
public final class DBContract {

    // 誤ってインスタンス化しないようにコンストラクタをプライベート宣言
    private DBContract() {}

    // テーブルの内容を定義
    public static class DBEntry implements BaseColumns {
        // BaseColumns インターフェースを実装することで、内部クラスは_IDを継承できる
        public static final String TABLE_NAME           = "samp_tbl";
        public static final String COLUMN_NAME_TITLE    = "title";
        public static final String COLUMN_NAME_CONTENTS = "contents";
        public static final String COLUMN_NAME_UPDATE   = "up_date";
    }
}
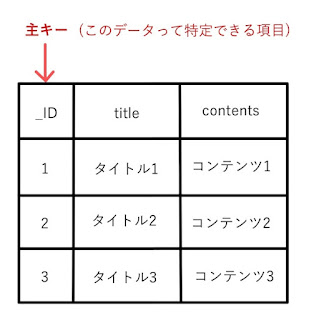
BaseColumns インターフェイスを実装することで、_ID と呼ばれる主キーフィールドを継承します。
データベース作成 SQLiteOpenHelper
Androidで標準で使えるSQLiteというデータベースを使います。
データベースとは、簡単に言うとたくさんの表の集まりです。
新しいJavaClassを追加して、名前を 「SampDatabaseHelper」とし、次の内容を入力します。
package com.ma_chanblog.samptextview;

import android.content.Context;
import android.database.sqlite.SQLiteDatabase;
import android.database.sqlite.SQLiteOpenHelper;
import static com.ma_chanblog.samptextview.DBContract.DBEntry;

// データベースをアプリから使用するために、 SQLiteOpenHelperを継承する
// SQLiteOpenHelperは、データベースやテーブルが存在する場合はそれを開き、存在しない場合は作成してくれる
public class SampDatabaseHelper extends SQLiteOpenHelper {

    // データベースのバージョン
    // テーブルの内容などを変更したら、この数字を変更する
    static final private int VERSION = 2;

    // データベース名
    static final private String DBNAME = "samp.db";

    // コンストラクタは必ず必要
    public SampDatabaseHelper(Context context) {
        super(context, DBNAME, null, VERSION);
    }

    // データベース作成時にテーブルを作成
    public void onCreate(SQLiteDatabase db) {

        // テーブルを作成
        db.execSQL(
            "CREATE TABLE "+ DBEntry.TABLE_NAME + " (" +
            DBEntry._ID + " INTEGER PRIMARY KEY, " +
            DBEntry.COLUMN_NAME_TITLE + " TEXT default 'タイトル', " +
            DBEntry.COLUMN_NAME_CONTENTS + " TEXT default '', " +
            DBEntry.COLUMN_NAME_UPDATE + " INTEGER DEFAULT (datetime(CURRENT_TIMESTAMP,'localtime'))) ");

        // トリガーを作成
        db.execSQL(
            "CREATE TRIGGER trigger_samp_tbl_update AFTER UPDATE ON " + DBEntry.TABLE_NAME +
            " BEGIN "+
            " UPDATE " + DBEntry.TABLE_NAME + " SET up_date = DATETIME('now', 'localtime') WHERE rowid == NEW.rowid; "+
            " END;");
    }

    // データベースをバージョンアップした時、テーブルを削除してから再作成
    public void onUpgrade(SQLiteDatabase db, int i, int i1) {

        db.execSQL("DROP TABLE IF EXISTS " + DBEntry.TABLE_NAME);
        onCreate(db);
    }
}
テーブル作成
onCreate()で、データベース作成時にテーブルも作成します。
execSQL()で、SQLというデータベース専用の命令を実行します。
CREATE TABLE テーブル名 ・・・テーブルを作成します。
PRIMARY KEY
DBEntry._ID + ” INTEGER PRIMARY KEY, “・・・_IDという名前の INTEGER型の項目を定義し、PRIMARY KEYとします。
PRIMARY KEYとは、この項目が主キーであり、一意である(内容が重複しない)ことを示しています。
INTEGER型 かつ PRIMARY KEY を指定すると、データ登録時に省略された場合、自動的に重ならない数値が保存されます。
default
DBEntry.COLUMN_NAME_TITLE + ” TEXT default ‘タイトル’・・・TEXT型の項目を定義しています。
default ‘タイトル’ と指定すると、データ登録時に省略された場合、自動的に「タイトル」という文字列が保存されます。
DBEntry.COLUMN_NAME_UPDATE + ” INTEGER DEFAULT (datetime(CURRENT_TIMESTAMP,’localtime’))・・・データ登録時に省略された場合、自動的にデータを登録した日時が保存されます。
TRIGGER
CREATE TRIGGER~・・・データが更新(UPDATE)されたとき、自動的に更新日時を上書きする命令です。
データベースアップグレード
onUpgrade() は、データベースのバージョン(VERSION)の値が変更されたときに実行されます。
「DROP TABLE~」 で、一度テーブルを削除して、onCreate()でテーブルを作成し直します。
逆に言うと、バージョンの値を変更しないと、テーブルの変更などが反映されませんので注意です。
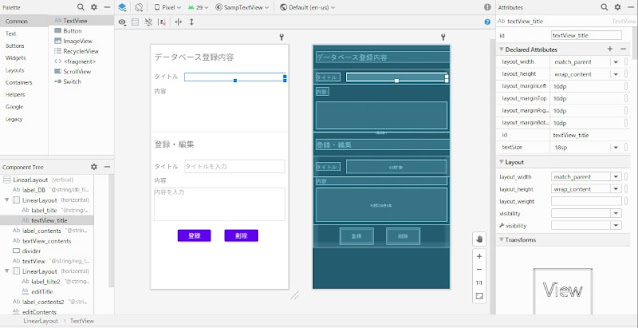
画面レイアウト
app/res/values/activity_main.xml の内容を変更して画面のレイアウトを設定します。
こちらは、画面例です。

activity_main.xml
activity_main.xml(クリックして表示)
<?xml version="1.0" encoding="utf-8"?>
<LinearLayout xmlns:android="http://schemas.android.com/apk/res/android"
    android:layout_width="match_parent"
    android:layout_height="wrap_content"
    android:orientation="vertical">

    <TextView
        android:id="@+id/label_DB"
        android:layout_width="match_parent"
        android:layout_height="wrap_content"
        android:layout_marginBottom="20dp"
        android:layout_marginStart="10dp"
        android:layout_marginTop="20dp"
        android:text="@string/db_title"
        android:textAlignment="textStart"
        android:textSize="24sp" />

    <LinearLayout
        android:layout_width="match_parent"
        android:layout_height="match_parent"
        android:orientation="horizontal">

        <TextView
            android:id="@+id/label_tilte"
            android:layout_width="wrap_content"
            android:layout_height="wrap_content"
            android:layout_marginBottom="10dp"
            android:layout_marginLeft="10dp"
            android:layout_marginRight="10dp"
            android:layout_marginTop="10dp"
            android:text="@string/title"
            android:textSize="18sp" />

        <TextView
            android:id="@+id/textView_title"
            android:layout_width="match_parent"
            android:layout_height="wrap_content"
            android:layout_marginBottom="10dp"
            android:layout_marginLeft="10dp"
            android:layout_marginRight="10dp"
            android:layout_marginTop="10dp"
            android:textSize="18sp" />
    </LinearLayout>

    <TextView
        android:id="@+id/label_contents"
        android:layout_width="wrap_content"
        android:layout_height="wrap_content"
        android:layout_marginBottom="10dp"
        android:layout_marginLeft="10dp"
        android:layout_marginRight="10dp"
        android:layout_marginTop="10dp"
        android:text="@string/contents"
        android:textSize="18sp" />

    <TextView
        android:id="@+id/textView_contents"
        android:layout_width="match_parent"
        android:layout_height="80dp"
        android:layout_marginBottom="10dp"
        android:layout_marginLeft="10dp"
        android:layout_marginRight="10dp"
        android:layout_marginTop="10dp"
        android:textSize="18sp" />

    <View
        android:id="@+id/divider"
        android:layout_width="match_parent"
        android:layout_height="1dp"
        android:background="?android:attr/listDivider" />

    <TextView
        android:id="@+id/textView"
        android:layout_width="match_parent"
        android:layout_height="wrap_content"
        android:layout_marginBottom="20dp"
        android:layout_marginStart="10dp"
        android:layout_marginTop="20dp"
        android:text="@string/reg_title"
        android:textSize="24sp" />

    <LinearLayout
        android:layout_width="match_parent"
        android:layout_height="match_parent"
        android:orientation="horizontal">

        <TextView
            android:id="@+id/label_tilte2"
            android:layout_width="0dp"
            android:layout_height="wrap_content"
            android:layout_marginBottom="10dp"
            android:layout_marginLeft="10dp"
            android:layout_marginRight="10dp"
            android:layout_marginTop="10dp"
            android:layout_weight="1"
            android:text="@string/title"
            android:textSize="18sp" />

        <EditText
            android:id="@+id/editTitle"
            android:layout_width="300dp"
            android:layout_height="40dp"
            android:layout_marginBottom="10dp"
            android:layout_marginLeft="10dp"
            android:layout_marginRight="10dp"
            android:layout_marginTop="10dp"
            android:background="@drawable/frame_border"
            android:hint="@string/input_title"
            android:importantForAutofill="no"
            android:inputType="text"
            android:singleLine="true" />
    </LinearLayout>

    <TextView
        android:id="@+id/label_contents2"
        android:layout_width="match_parent"
        android:layout_height="wrap_content"
        android:layout_marginBottom="10dp"
        android:layout_marginLeft="10dp"
        android:layout_marginRight="10dp"
        android:text="@string/contents"
        android:textSize="18sp" />

    <EditText
        android:id="@+id/editContents"
        android:layout_width="match_parent"
        android:layout_height="100dp"
        android:layout_marginBottom="10dp"
        android:layout_marginLeft="10dp"
        android:layout_marginRight="10dp"
        android:background="@drawable/frame_border"
        android:gravity="top"
        android:hint="@string/input_contents"
        android:importantForAutofill="no"
        android:inputType="textMultiLine|text"
        android:singleLine="true" />

    <LinearLayout
        style="?android:attr/buttonBarStyle"
        android:layout_width="match_parent"
        android:layout_height="match_parent"
        android:orientation="horizontal">

        <Button
            android:id="@+id/btn_reg"
            style="?android:attr/buttonBarStyle"
            android:layout_width="100dp"
            android:layout_height="wrap_content"
            android:layout_gravity="center"
            android:layout_marginBottom="10dp"
            android:layout_marginEnd="10dp"
            android:layout_marginStart="80dp"
            android:layout_marginTop="10dp"
            android:onClick="onSave"
            android:text="@string/reg"
            android:textSize="18sp" />

        <Button
            android:id="@+id/btn_del"
            style="?android:attr/buttonBarStyle"
            android:layout_width="0dp"
            android:layout_height="wrap_content"
            android:layout_gravity="center"
            android:layout_marginBottom="10dp"
            android:layout_marginEnd="90dp"
            android:layout_marginStart="30dp"
            android:layout_marginTop="10dp"
            android:layout_weight="1"
            android:onClick="onDelete"
            android:text="@string/del"
            android:textSize="18sp" />

    </LinearLayout>

</LinearLayout>
文字数は多いですが、画面デザインのパラメータを定義しているだけなので、そんなにひっかかるところはないと思います。
この画面は、「LinearLayout」というレイアウトを使用しています。
LinearLayoutは、ウィジェットと呼ばれるボタンなどのパーツを縦一列か、横一列に並べるレイアウトです。
その中にTextView や、入れ子でさらに LinearLayout を配置しています。
各パーツの幅や高さ、マージンなどを設定しています。
「editTitle」というidのEditTextのバックグラウンドに、frame_border を指定することで、タイトル入力欄に枠線を表示しています。内容入力欄も同様です。
一番下の「登録」ボタンをクリックしたとき、onClick=”onSave” で MainActivityのonSave()を呼ぶように設定しています。
削除ボタンも同様に、onDelete() を設定しています。
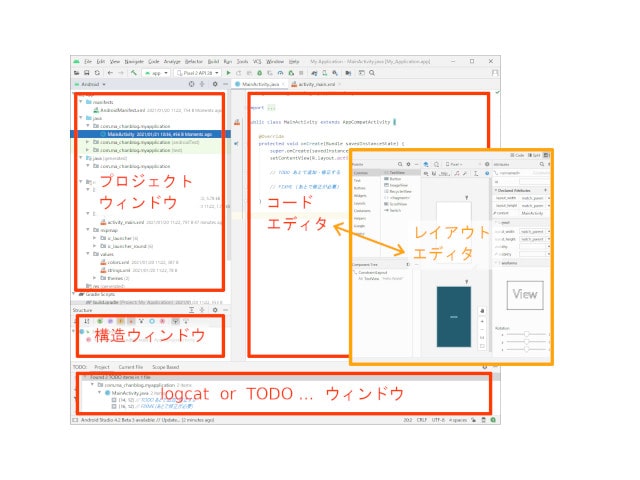
レイアウトエディタも合わせて使用すると、画面のレイアウトがイメージしやすく、設定できるオブジェクトやパラメータが確認できるので便利です。
アクティビティ(MainActivity)
MainActivityの内容を次のように変更します。
MainActivity (クリックして表示)
package com.ma_chanblog.samptextview;

import androidx.appcompat.app.AppCompatActivity;

import android.content.ContentValues;
import android.database.Cursor;
import android.database.sqlite.SQLiteDatabase;
import android.os.Bundle;
import android.view.View;
import android.widget.EditText;
import android.widget.TextView;
import static com.ma_chanblog.samptextview.DBContract.DBEntry;

public class MainActivity extends AppCompatActivity {

    private SampDatabaseHelper helper = null;

    private TextView viewTitle    = null;
    private TextView viewContents = null;
    private EditText editTitle    = null;
    private EditText editContents = null;

    @Override
    protected void onCreate(Bundle savedInstanceState) {
        super.onCreate(savedInstanceState);
        setContentView(R.layout.activity_main);

        // ビューオブジェクトを取得
        viewTitle    = findViewById(R.id.textView_title);
        viewContents = findViewById(R.id.textView_contents);
        editTitle    = findViewById(R.id.editTitle);
        editContents = findViewById(R.id.editContents);

        // ヘルパーを準備
        helper = new SampDatabaseHelper(this);

        // データを表示
        onShow();
    }

    // データを表示する
    protected void onShow() {

        // データベースから取得する項目を設定
        String[] cols = {DBEntry.COLUMN_NAME_TITLE, DBEntry.COLUMN_NAME_CONTENTS};

        // 読み込みモードでデータベースをオープン
        try (SQLiteDatabase db = helper.getReadableDatabase()) {

            // データを取得するSQLを実行
            // 取得したデータがCursorオブジェクトに格納される
            Cursor cursor = db.query(DBEntry.TABLE_NAME, cols, null,
                    null, null, null, null, null);

           // moveToFirstで、カーソルを検索結果セットの先頭行に移動
           // 検索結果が0件の場合、falseが返る
            if (cursor.moveToFirst()){

                // 表示用のテキスト・コンテンツに検索結果を設定
                viewTitle.setText(cursor.getString(0));
                viewContents.setText(cursor.getString(1));

                // 入力用のテキスト・コンテンツにも検索結果を設定
                editTitle.setText(cursor.getString(0));
                editContents.setText(cursor.getString(1));

            } else {
                // 検索結果が0件の場合のメッセージを設定
                viewTitle.setText("データがありません");
                viewContents.setText("");

                editTitle.setText("");
                editContents.setText("");
            }
        }

    }

    // 保存処理
    public void onSave(View view) {

        // 入力欄に入力されたタイトルとコンテンツを取得
        String title    = editTitle.getText().toString();
        String contents = editContents.getText().toString();

        // 書き込みモードでデータベースをオープン
        try (SQLiteDatabase db = helper.getWritableDatabase()) {

            // 入力されたタイトルとコンテンツをContentValuesに設定
            // ContentValuesは、項目名と値をセットで保存できるオブジェクト
            ContentValues cv = new ContentValues();
            cv.put(DBEntry.COLUMN_NAME_TITLE, title);
            cv.put(DBEntry.COLUMN_NAME_CONTENTS, contents);

            // 現在テーブルに登録されているデータの_IDを取得
            Cursor cursor = db.query(DBEntry.TABLE_NAME,  new String[] {DBEntry._ID}, null, null,
                                null, null, null, null);

            // テーブルにデータが登録されていれば更新処理
            if (cursor.moveToFirst()){

                // 取得した_IDをparamsに設定
                String[] params = {cursor.getString(0)};

                // _IDのデータを更新
                db.update(DBEntry.TABLE_NAME, cv, DBEntry._ID + " = ?", params);

            } else {

                // データがなければ新規登録
                db.insert(DBEntry.TABLE_NAME, null, cv);
            }
        }

        // データを表示
        onShow();

    }

    // 削除処理
    public void onDelete(View view){

        try (SQLiteDatabase db = helper.getWritableDatabase()) {
            db.delete(DBEntry.TABLE_NAME, null, null);
        }

        // データを表示
        onShow();
    }

}
onCreate()
onCreate()は、システムが最初にアクティビティを作成したときに呼び出されるメソッドです。
findViewByIdで、レイアウトファイルの中からウィジェットを検索して、ビューオブジェクトを取得します。
onSave()
onSave()メソッドは、「登録」ボタンがクリックされたときに実行されます。
EditTextから、タイトルとコンテンツを取得し、データベースに登録します。
このとき、データベースにデータが登録されていれば上書き、データがなければ新規登録を行っています。
最後に、onShow()メソッドをコールして、画面を再表示しています。
onDelete()
onDelete() メソッドは、データベース内のデータを削除します。
その後、onShow()メソッドをコールして、画面を再表示しています。
まとめ
Android Studioで、SQLiteデータベースにアクセスする方法を紹介しました。
EditTextからデータを取得してデータベースに登録したり、データベースからデータを取り出してTextViewに表示したりといった一連の動きが、シンプルなソースで確認できたと思います。
次回は、もう少し複雑なアプリを紹介したいと思います。